How To: Add a Location
To add a physical location, you must have one of the following roles:
- General System Administrator
- Fulfillment Administrator
updated 12/01/2025
Part 1- To add a physical shelving location:
- Open Configuration.
- From the Configuring drop-down list, select the library for which you want to add the location.
- Select Fulfillment > Locations > Physical Locations or, if you have the General System Administrator role, General > Locations > Physical Locations.
(If you see only Remote Storage, you have the institution selected, not the library.) - Select Add Location.
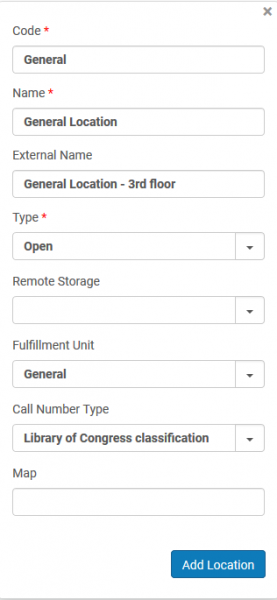
The Add Location window will open.
- Enter the following values as appropriate for your new location.
- Code: Enter the location code in lowercase. It can be up to ten characters that are alphanumeric characters, hyphens, or underscores. Match the formatting of your previous codes- for example, do they all start with letters to denote the library the location is in.
- Name: Add the location name in title case (i.e. "Main Library"). The name will display for staff in Alma, and Primo will display the name in the Get It section of an item's full display record if you do not specify an external name. After adding the location name, double-check to make sure that there are no trailing blank spaces in this field after the last letter of the location name. If this location name is used as a filter in a report and the location name contains a trailing blank space, the trailing blank space in the name will prevent results from being returned in Alma Analytics for this location.
- External Name: Optionally, specify an external name. Primo will display the name in the Get It section of an item's full display record.
- Type: Specify one of the following types. You can use the type as a filter on the Physical Locations page. Many libraries set all locations to "Open" for simplicity.
- Open: A location that patrons can be access. Patrons can remove an item from the location and then check out the item.
- Closed: A location that library personnel only can access. Patrons cannot access this location.
- Remote Storage: An off-site location that library personnel only can access. Patrons cannot access this location. Retrieving an item from remote storage often takes longer than from other types of locations. Only choose this option if you have an Automated Retrival System that works with this location.
- Unavailable: A location from which items are considered unavailable. This setting is used to determine whether a General Electronic Service is enabled. For more information, see Configuring general electronic services.
- Not In Location: This location indicates that a copy belonging to the instructor is currently in that instructor's possession. It will be brought to the library at a later time.
- Remote Storage: Optionally, if the location has a remote storage facility, select the facility for the location. Note that a location of any type may be associated with a remote storage facility.
- Fulfillment Unit: Leave this section blank; locations are assigned to fulfillment units in Part 3 of these directions.
- Call Number Type: Optionally, select a call number type for the location. This type identifies the type of call number in the holdings record, such as Library of Congress classification, Dewey Decimal classification, or National Library of Medicine classification.
- Map: Optionally, specify the URL of a map that can assist patrons in finding the location.
- Select Add Location to save the location.
Part 2- Attach to circulation desk
You will need to attach the new location to a circulation desk to allow library staff to handling transactions (that is, picking from the shelf, checking in and out, and reshelving).
To attach the location:
- Locate the new location in the Physical Locations List.
- Select the row action option ellipsis for the location, and choose Edit.
- In the Physical Location Circulation Desks List section:
- To associate an existing circulation desk with the physical location, select Attach Existing Circulation Desk. Choose the circulation desk from the drop down list, select the services provided by the circulation desk to the physical location (Check In, Check Out, and/or Reshelve), and select the Attach Existing Circulation Desk button.
- To create a new circulation desk and associate it with the physical location, select Attach New Circulation Desk. See Adding a Circulation Desk for information about the fields to enter.
- Save your changes to the physical location.
Alternative method to attach location: You can also attach the location to the circulation desk by editing the circulation desk.
- In configuration at the library level, navigate to Fulfillment> Library Management> Circulation Desks.
- Select the name of the circulation desk to open the desk settings.
- On the Physical Locations tab, select the "Attach location" option at the top of the table.
- Select the location from the dropdown menu, then select the services provided by the circulation desk to the physical location (Check In, Check Out, and/or Reshelve).
- Select the Attach location button.
- Save your changes to the physical locations list.
PART 3- Review Fulfillment Unit
Review both the loan and request rules in the Fulfillment Unit where location is added to see if any rules need adjusted to account for the new location.
The configuration at each I-Share library is different, and thus difficult to document. Contact support@carli.illinois.edu, and we'd be happy to assist with and individualized review.
Part 4- Review Overdue and Lost Loan Profiles
Review both the overdue and lost loan profiles at your institution to see if any profiles need adjusted to account for the new location.
The configuration at each I-Share library is different, and thus difficult to document. Contact support@carli.illinois.edu, and we'd be happy to assist with and individualized review.

