
How-To: Using Local Extensions for Copy-Specific Bibliographic Data
In the I-Share implementation of Alma, institutions will frequently describe their collections using shared bibliographic records. These shared records are stored in the Alma Network Zone (NZ), while local details are stored in the institution zone (IZ). Local details include a library's inventory records--holdings, items, portfolios--and local bibliographic details such as notes and local headings that are relevant to the library's users.
A local extension is a MARC bibliographic tag that may be added to a shared NZ bib record, but the data is stored and visible only in the IZ copy of the bib record. Local extensions may be applied only for the following tags and tag ranges:
- 09X
- 59X
- 69X
- 77X
- 78X
- 9XX
CARLI is establishing common conventions for the use of several of these fields, which will assist with making the data available via searches and analytics more reliably. View the list of I-Share Common Definitions for Local Extensions for more information.
Using Local Extensions
Add Local Extensions to Bibliographic Records in the MEtadata Editor
- Begin editing the bibliographic record in the metadata editor (MDE)
- Click anywhere in the body of the record, typically where the tag would fall numerically.
- In the old metadata editor, select the Edit menu, then select Add Local Extension.
- In the new metadata editor, select the Editing Actions menu, then select Add Local Extension.
- In either editor, typing Ctrl+L will add the field
- The MDE will create a new, blank row, the cursor should be in the tag position. Type the tag you wish to add, then tab or enter.
- Alma will add an "institution" icon to the immediate left of the tag, identifying the tag as a local extension. You may now edit the field as desired.
- Add indicator values according to tag specifications and data needs.
- Add subfields according to the data needs. To add a subfield, type the F9 key which adds two dollar signs ($$), then supply the subfield code.
Use a Normalization Rule to Copy Data from the Shared NZ bib to a Local Extension
Normalization rules enable catalogers to automate record modifications, either on demand or as part of other processes. Normalization rules that create or modify local extensions must be stored in your institution zone, as local extensions are exclusive to your IZ.
A user should have the Catalog Administrator to create normalization rules and make them available for the Enhance a Record function. Users with Cataloger or Catalog Manager role will be able to edit and use rules after they are enabled.
- Open the metadata editor.
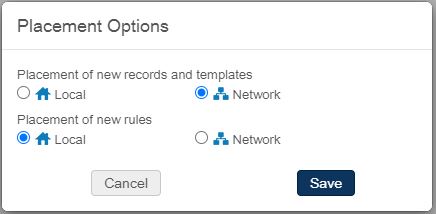
- Select the New menu, then select Placement Options.
- Under Placement of new rules, select Local, then click Save.
- Click Rules.
- Select the New menu, then Normalization.
- In the Normalization Rule Properties dialogue, enter data similarly to the following:
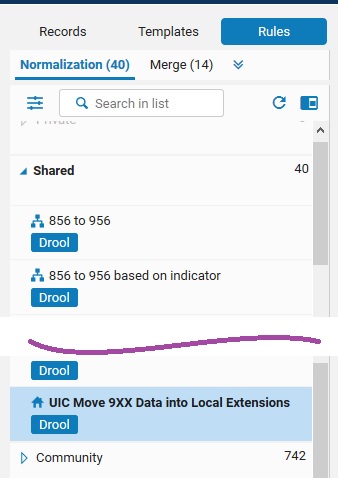
- Name: XXX Move 9XX Data into Local Extensions (XXX is your CARLI three-letter code)
- Description: Move 9XX Data into Local Extensions
- Type: Drool
- Select Shared
- Select Enabled
- Click Save.
- Locate and select the new rule in the list of normalization rules under the Shared section.
- Click into the editing area of the metadata editor. Using the form and syntax found in the Working with Normalization Rules document, create a rule similar to the following:
	rule "Move 9XX data into local extensions"
		when
			TRUE
		then
			addSubField "952.9.local"
			addSubField "950.9.local"
        # If there are more 9XX fields in your incoming data, you will want to add entries for those fields following the example here
	end
- Click Save.
Note the following steps should be performed by a user with the Catalog Administrator role.
- Open Alma Configuration.
- Go to Resources > Cataloging > Metadata Configuration.
- Click MARC21 Bibliographic.
- Select the Normalization Processes tab.
- Click Add Process.
- Enter the name and description that you applied to the normalization rule you created above.
- Name: XXX Move 9XX Data into Local Extensions (XXX is your CARLI three-letter code)
- Description: Move 9XX Data into Local Extensions
- Click Next.
- Click Add Tasks.
- Select the checkbox for MarcDroolNormalization, then click Add and Close.
- Click Next.
- For the Drools File Key, select the rule you created above.
- Click Save.
- Go to Resources > Cataloging > Metadata Configuration.
- Click MARC21 Bibliographic.
- Click Deploy.
You may now return to Alma and reopen the metadata editor. To apply this rule to a record open in the metadata editor:
- Select the Editing Actions menu, then select Enhance the Record.
Add Local Extension Data in WorldCat Bibs Before Using Connexion Gateway Export
Bibliographic fields may be tagged as local extensions by including $9 LOCAL (upper case or lower case) in the incoming data, provided the field is one of the eligible tags listed above. That is, you may tag a 949 with $9 LOCAL, and the resulting record will contain a local extension of the 949 field; however, tagging a 500 with $9 LOCAL will not result in the record having a 500 as a local extension.
Add Local Extension Data in WorldCat Bibs Using Import Profiles
Making Local Extensions Visible in Primo VE
See CARLI Recommendations on Local Fields in Primo VE for I-Share for information on how to display Local Extensions as Local Fields.
Frequently Asked Questions
Q: Where may I store my local call number in the bibliographic record?
A: When you want to store your local call number to the bibliographic record, and you want to save it for your library's use only, add it to an 09X field. The following tags are specified by OCLC's Bibliographic Formats & Standards.
090 -- Locally Assigned LC-type Call Number
092 -- Locally Assigned Dewey Call Number
096 -- Locally Assigned NLM-type Call Number
098 -- Other Classification Schemes
099 -- Local Free-Text Call Number
Footer
Footer Copyright
© 2025 University of Illinois Board of Trustees | Legal | U of I Privacy Notice | CARLI Privacy Notice